KLIKConnect Version 3.0 for Windows & Mac
KLIKConnect Overview
KLIKConnect is an application that is installed on a client computer to facilitate screen sharing from that device to a KLIK wireless presentation system. KLIKConnect works with KLIK Stik, KLIK Boks PLUS, PRO, & HUB.
KLIKConnect is available for Windows 8.1+ and Mac OSX High Sierra+ operating systems.
The Windows version of KLIKConnect 3.0 is available for download here.
The Mac version of KLIKConnect 3.0 is available for download here.
Installation
- Download the required version of KLIKConnect 3.0 and save to the target device.
- Double-click the installation package to run the installer.
- Accept any pop-up messages and allow the installation to complete.
- Mac users may be prompted to change permissions to allow KLIKConnect to share the screen, camera and microphone with KLIK.
Operation
Start KLIKConnect by double-clicking on the application icon.
The application will start and display the Discovery Panel. On first start, the Discovery Panel scans for available Wi-Fi access points and available KLIK devices, whether those devices are connected to a network, or not connected to a network.
If the application has been run before, the Discovery Panel will show Saved KLIK devices at the top of the discovery list, for direct selection. Next, it will indicate found KLIK devices and finally found Wi-Fi access points.
If the KLIK device is connected to a network other than the network to which the PC is connected, simply select the correct Wi-Fi network from the Discovery Panel, to change the network.
On selection of a new Wi-Fi network, the Discovery Panel expands to reveal the Password field.
Enter the password required for the new Wi-Fi network and click OK to proceed.
Once authenticated to the network, the Discovery Panel will show any KLIK devices connected to that network.
Select the KLIK device by name and enter the password displayed on the KLIK screen. Note that the Save selection is checked by default. Uncheck if you do not want to save this KLIK for future sessions.
If there is no password displayed simply click on Play to connect to the KLIK.
On some networks, the Discovery Panel will be blocked from locating KLIK devices by name. In that case, KLIKConnect allows for connection by IP address. Click on the Search icon to open the IP Address entry field.
Enter the IP Address as displayed on the KLIK screen, along with the password if enabled. Click Play to connect to the KLIK device.
Once a connection has been established to the KLIK device, the Discovery Panel will close, and the Player will launch.
If the KLIK password feature is enabled, the password will be shown inside the player. This makes it easier for new participants to connect to KLIK, while others are streaming to the screen.
The Player contains several controls that aid in the operation of the KLIK screen sharing function, as well as provide access to additional features and functions.
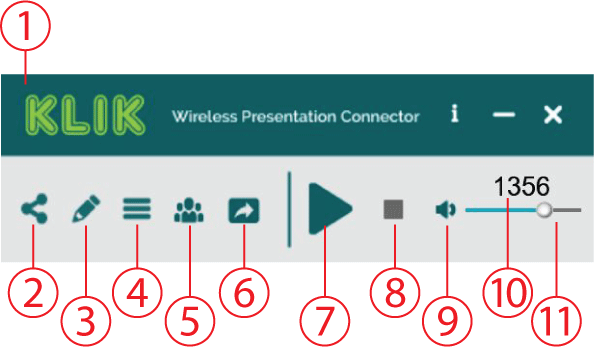
| Item # | Feature |
| 1 | KLIKConnect Player Panel |
| 2 | FileShare function |
| 3 | Annotation & Whiteboard function |
| 4 | User Settings |
| 5 | Moderator Mode access |
| 6 | KLIKStream remote viewing function |
| 7 | Play/Pause button streaming |
| 8 | Stop streaming button |
| 9 | Audio Mute/Unmute button |
| 10 | KLIK access password |
| 11 | Audio Volume Control |
KLIKConnect Player Panel
The KLIKConnect Player panel is visible when the PC is connected to a KLIK device.
FileShare Function
KLIKConnect includes a file sharing function that allows users to share files across the network, from within the app. To enable the file sharing function, click on the FileShare icon in the Player.

The FileShare panel opens, allowing users to either Share files or Download files.
To share files, select the Share tab, then drag and drop files into the staging area. To remove files, click on files to be removed and click Remove. To remove all files, click on Remove All.
Note: There is a 10MB limit on file size.
Select the users to receive the files by highlighting them individually. Select all users by clicking Select All. Deselect all users by clicking Deselect All.
Once the files have been placed in the staging area and the target users have been selected, click on Share to make the files available to those users.
Users who have the KLIKConnect app running but do not have the FileShare utility running will be notified by flashing of the FileShare icon on their Player.
To receive files, open the FileShare utility and select the Download tab, then find the file source and click Yes.
The download process will begin automatically.
Once the file(s) are downloaded, click on Open to open the file(s).
Annotation & Whiteboard Function
KLIKConnect includes a fully-featured on-screen annotation and whiteboard application that allows a user to mark up on-screen content.
Launch the Annotation application by clicking on the Annotation icon in the Player.

The Annotation panel will open on the left side of the screen.
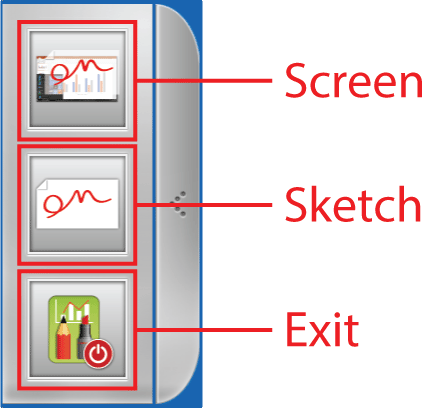
Select the top button inside the panel to enable Annotation over the current screen image.
Select the middle button to enable the whiteboard function.
Select the bottom button to exit the annotation application.
Select the Left arrow to temporarily hide the annotation control panel.
The Annotation Panel changes state when Annotation is active.
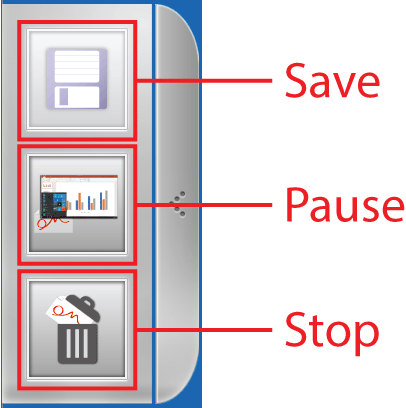
Select the Save button to save the currently displayed image and annotation markup. Images are saved in PNG format, to the KLIKConnect program folder by default.
Select the Pause button to temporarily pause the annotation application and hide the markups from the screen. Select Pause again to reveal the annotations.
Select Stop to end the annotation session and delete any markups.
Right-click anywhere on the desktop while Annotation is enabled to reveal the Toolbar.
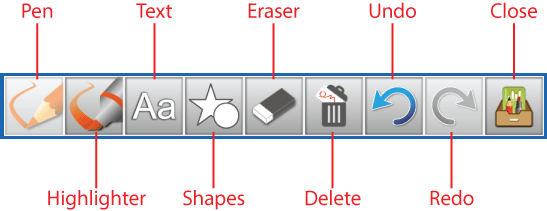
Use the toolbar to select the required tool, then click on Close to hide the toolbar.
User Settings
KLIKConnect offers a variety of functional options and settings that may be selected by the user. These options do not affect the settings and options of the KLIK device beyond the current user session. To open the Settings menu, click on the Settings icon.

The Settings menu offers access to several user functions and settings that remain active only for the duration of the user's session.
Display Mode allows selection between Mirror Mode, or Extended Mode. Mirror Mode mirrors the user's screen exactly as displayed on their PC. Extended Mode turns the KLIK device into a second screen that uses the PC's Extended Desktop capability. Note: Not all PCs support Extended Desktop mode.
HDMI Resolution allows the user to change the display resolution for their screen sharing session.
Aspect Ratio allows the user to change the display aspect ratio from the current default, to better match the aspect ratio of their content.
User Settings provides access to the following settings for this user only:
- Auto Adjust Resolution allows the KLIK device to automatically adapt to the resolution of the user's content, and is enabled by default.
- Auto Save Settings ensures that KLIKConnect settings made by the user are retained, and is enabled by default.
- Enable Shared USB allows sharing of a connected HID-compatible mouse, keyboard or touch panel through the KLIK device, and is enabled by default.
- Show Cursor On-screen enables the display of the presenter's cursor on the display screen, and is disabled by default.
- SlideShow Presentation Mode reduces the frame rate of the display, favoring maximum resolution over video, and is disabled by default.
- Auto-Start Stream allows the screen sharing session to start immediately on connection of the user to the KLIK device, and is disabled by default.
Moderator Mode Access
KLIKConnect offers a Moderator function that allows for one user to be designated as a moderator who controls access to the display screen. The moderator chooses which user can screen share, by controlling the Start function. The moderator can also terminate a screen sharing session.
To access the Moderator Mode, click on the icon inside the Player.

The Administrator Login panel will open, prompting for the username and password. The default User Name is "admin" and the password is "adminpwd". These settings may be changed in the settings panel found in the System Settings for the KLIK device.
Once validated, the Moderator Control Panel will open.

The Moderator Control Panel is divided into 4 sections.
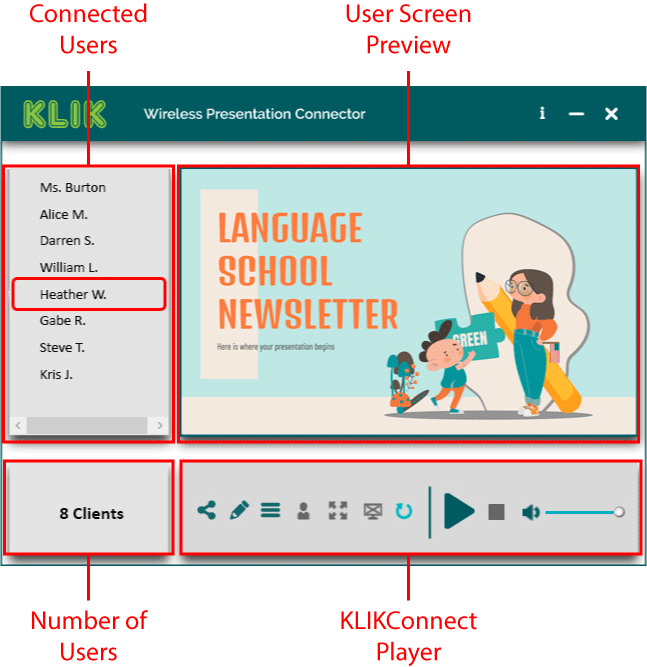
The Connected Users section contains a list of the users that are currently connected to the KLIK device. The moderator may select any of the users from this list to view the contents of their screen in the User Screen Preview area. They may also start or stop a screen sharing session for a selected user.
Users may not start a screen sharing session when moderator mode is enabled. They may however end a screen sharing session by clicking on the Stop button on their KLIKConnect Player.
KLIKStream Remote Viewing Function
KLIKConnect includes a shortcut access button to the KLIKStream remote viewing feature found in all KLIK models.

Click on the KLIKStream icon to start the remote viewing session inside the default browser on the PC.
The KLIKStream window displays the current screen sharing session, or the standby screen when no screen sharing session is active. Controls along the bottom of the window allow the viewer to make adjustments to the stream.
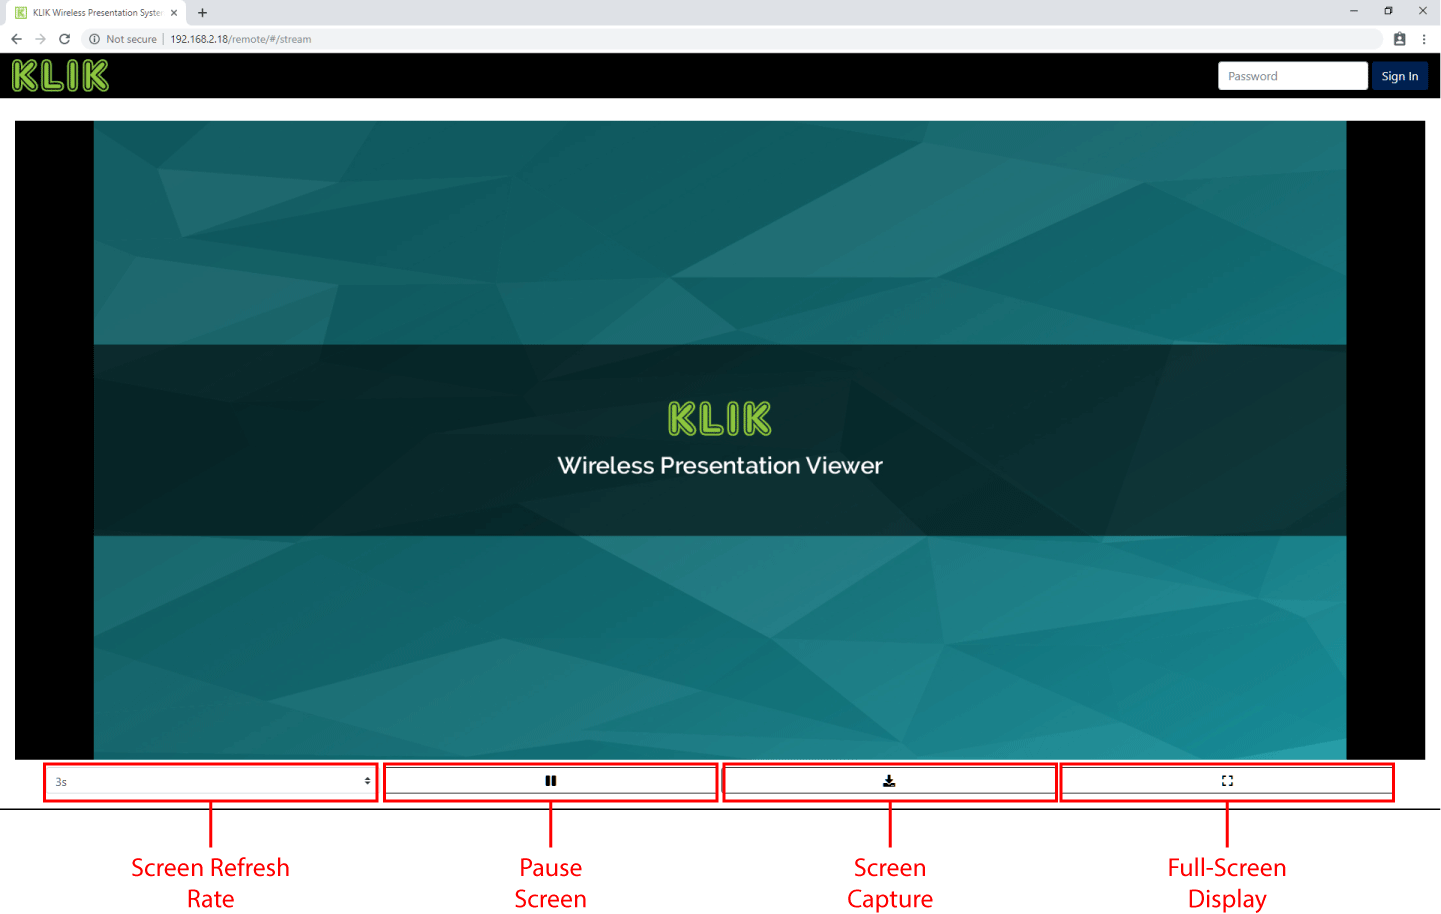
Screen Refresh rate allows the user to select the number of seconds between screen refresh. The minimum value is 1 second, the default value is 3 seconds, and the maximum value is 60 seconds. The lower the refresh value, the faster the screen will update.
The Pause Screen control allows a user to hold the view of the currently displayed frame indefinitely. Pausing the screen does not affect what is being viewed on the KLIK display screen, or what is being viewed by other users. Click to toggle between pause and run.
The Screen Capture control allows the user to capture the currently displayed frame and save it to local storage, for later review. The image capture ius saved as a PNG file to the local Downloads folder, and is tagged with the KLIKStream title and a date and time stamp.
The Full Screen control allows the user to toggle between the original aspect ratio of the displayed frame, and a maximized version of the frame that may exceed the bounds of the viewable page. Click once to view a maximized version of the frame, and click again to return to the original aspect ratio.
Play/Pause Screen Sharing
A screen sharing session is initiated by clicking on the Play button.

While a screen sharing session is active, a red band is shown at the bottom of the Player the Play button is replaced by the Pause button. The Pause button freezes the currently displayed frame indefinitely, allowing the presenter to locate files or open content that is not visible to viewers. Press Pause again to resume live screen sharing.
Stop Screen Sharing
Press the Stop button to end a screen sharing session. This stops live screen sharing but does not disconnect the user from the KLIK device. A new screen sharing session may be initiated by pressing the Play button.

Audio Mute/UnMute
Click on the speaker icon to alternately Mute/Unmute the audio being shared.
KLIK Access Password
The KLIK device password is displayed inside the Player as an aid to users who are joining the session after a screen sharing session has started.
Audio Volume Control
The audio volume control allows the presenter to adjust the sound level of audio being shared.

Comments
0 comments
Please sign in to leave a comment.