General Overview
What
KLIK Manager is a desktop application that runs on Linux, Mac or Windows (3 different apps). The app is designed for use by system administrators who manage multiple KLIK Boks units in a given installation. Manager allows admins to see and control all KLIK Boks units from a console, making it easier and faster to manage them.
Why
KLIK already has a web interface that allows for remote management, so why did we create Manager? Because the web interface is optimized for access to one device at a time, with an emphasis on ease of use. Manager presents system admins with a lot more information, about multiple units, and allows changes to those units in bulk, so it is inherently more suited for professional users.
When
KLIK Manager is being phased in, with the release of beta Versions 0.8.1 for Windows, Linux & Mac, released first. The app will remain in beta through November, with Version 1.0 slated for release in December, 2018.
How
Manager combines several tools and features under one application, for the most cohesive and integrated user experience possible. Built on Electron, the same technology that powers Slack, Skype and many other cutting-edge applications, Manager is powerful, adaptive and efficient because it’s built to be cross-platform right from the start.
Additional details
- KLIK Manager is licensed software, available only to owners of KLIK Boks hardware
- Manager is not Free software and may not be redistributed; all users must register
- Manager runs on a local machine (Linux, Mac & Windows)
- No additional software or servers are required for Manager to operate
- There is currently no “demo mode” in Manager; it must connect to KLIK to function
Installation
Manager is packaged for Linux (two versions, Debian & Redhat), Mac & Windows distributions, with an installation utility. Approximately 200MB of local drive space is needed to install the software.
Application Layout
On launch, the user is presented with the Main Console view. Release versions will prompt for a user name and password, before entering the Console view.

The Main Console view is divided into three sections; Control Bar, Action Area and Discovery Panel.
The Control Bar displays three tabs across the top left, labeled Local, Global & View. By default, Local view is loaded on launch. To the right are the Cancel & Apply buttons, which commit changes to the selected device(s).

The Action Area contains a mixture of controls and information related to a selected KLIK Boks and is divided into three columns.

KLIK Name Settings
The left-most column displays the KLIK Name in an editable field, which allows direct editing of the name (and SSID). It also displays information about the current firmware version, with both the current version number and an indicator showing if there is a newer version available; a Green check mark indicates latest version is installed, an Orange triangle indicates that a later version is available.
Also indicated are the current wireless settings, whether or not the KLIK is in virtual access point mode, such as wireless mode, Wi-Fi channel and security status. These wireless settings are only applicable when KLIK is in virtual AP mode.
KLIK Network Settings

In the right-most column are the Network and Video settings. When DHCP is selected, KLIK derives its network IP address and Subnet Mask from the server. When the DHCP setting is not selected, the IP Address, Subnet Mask and Gateway fields are editable, allowing for the manual input of static settings.
Admins can select DHCP, for automatic IP address assignment or deselect for manual (fixed) IP address and subnet mask. Fields are editable only when indicated by the underline. Changes may be committed immediately as they’re entered, or combined with others and applied together.
KLIK General Settings

The middle column contains controls that set options:
- Language – Change the language displayed on Standby Screens.
- Allow Override – Allows new user to Override current user.
- Enable Password – Turns KLIK Password on or off.
- Change Wallpaper – Push new wallpaper to Standby Screens.
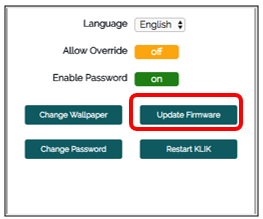
- Update Firmware – Check for and apply latest firmware.
- Change Password – Set the Admin password for KLIK.
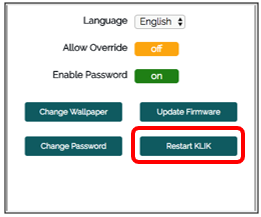
- Restart KLIK – Force a restart (reboot) of KLIK.
Discovery Panel

The Discovery Panel region is where all discovered KLIK units are shown. The table is populated continually, as units come online or go offline. Note that the discovery panel will show KLIK units discovered on the network, as well as any units that are not yet network connected, by detecting their SSID (if the computer has Wi-Fi enabled).
Operation
Principle of Operation
KLIK Manager combines three key functions into the application; 1) Device Discovery, 2) Read-only Status Checks, 3) Remote Control and 4) Remote Viewing. The discovery component finds and identifies KLIK units on the network, or off. Settings and status of each KLIK device are read and reported in various locations in the app. A variety of system settings can be accessed and altered remotely. A remote viewing window allows monitoring of the KLIK video output when a streaming session is in progress.
KLIK Discovery
The KLIK Manager application discovers KLIK units by using the host machine’s network connection interface(s) to “listen” for KLIK Boks units. The app listens for traffic on the wired (Ethernet) network through the network interface card, as well as the wireless (Wi-Fi) adapter, if so equipped. In addition, Manager can discover KLIK Boks units that are not connected to a network, when those units are in Virtual AP mode.

Device discovery requires no user intervention to initiate or refresh. Since the application is always listening, it will locate and identify a KLIK Boks within seconds of that device coming online. Once a KLIK Boks is detected, it is added to the device table, which lists Name, IP Address, Network Status and Firmware version. In addition to Restart and View buttons, the device row displays an alternate-action plus (+), minus (-) button.
Once a KLIK Boks unit is identified for the first time, it will appear with a plus (+) sign in the selection column. The plus symbol indicates that the KLIK Boks has not yet been added to the database for this site. Pressing the plus button will commit the KLIK Boks to the database and the plus symbol will be replaced with a minus symbol. KLIK Boks units added to the database will continue to appear in the list, whether they are online or not.

On the top right of the Discovery table is an alternate-action button labeled “More”/ “Less”. This button works in conjunction with the device selectors and the database to allow for a filtered view of KLIK Boks units. Clicking More will reveal all detected KLIK Boks units, including those not committed to the database. Selecting Less will remove units not committed to the database from view. Use the minus button to remove any unwanted units from the database, then select units to be added with the plus button.

If all KLIK Boks units are deleted from the Discovery Panel, KLIK Manager will display that no devices are saved. Click on the Show Unsaved Devices or Show More button to reveal all found KLIK Boks units.

Local & Global Controls
By default, KLIK Manager launches in Local mode, which means that KLIK Boks units are selected and controlled individually. Ensure that the Local tab is highlighted, then to select a KLIK Boks, click inside that unit’s row; the row background color changes to blue and the KLIK Boks name and settings appear in the action area. Settings may be changed and applied to that specific unit only, by clicking on the Apply button.

Note that unique settings such as KLIK Name and Fixed IP Address, can only be applied in Local mode. It is therefore best practice to apply all Global changes first, followed by any customization of KLIK Boks name or network settings. Use Local mode to make name changes and set fixed IP addresses as needed.

Global changes are made by first selecting the Global tab in the Control Bar. A new selection column appears on the left side of the discovery panel, allowing for selection of multiple KLIK Boks units. Click on the check mark in the header row to select all KLIK Boks units or select individual units one at a time. With the required units selected, make the needed changes to settings and click Apply to commit the changes.

Note that when Global mode is active, only the General Settings panel is visible inside the action area. These are the only settings that qualify for application across multiple units as they contain no specific settings as represented by KLIK name and IP address.

KLIK Manager will prompt the user before pushing Global settings changes and restarting the selected KLIK Boks units.

The Language, Allow Override and Enable Password buttons operate in 3 states; On, Off and Ignore. On and Off states will toggle those functions On or Off irrespective of the current settings (or select the Language). The Ignore state will leave settings for that parameter unchanged, across all selected KLIK Boks units.
Change Wallpaper
KLIK Boks displays a Standby Screen when the unit is powered on and there is no streaming session open.

The default screen background can be changed by installing a new wallpaper, to replace the default wallpaper. Wallpaper files may be JPG or PNG image files and must be 1280 x 720 pixels in size.

Click on the Change Wallpaper button to reveal the finder; then select or drag a file to upload to the Manager application.

Images must be a minimum of 1280 x 720 pixels in size to fully fill the KLIK screen. Images larger than that will launch the image cropping utility automatically. Drag the corner of the selection box to alter the size of the selected image and drag to select the desired area. Click “Crop” to select the edited image.

Manager will display a mock-up of the four KLIK Standby Screens; click Apply to send the new wallpaper to the KLIK Boks and restart the unit.

A confirmation dialog will indicate the successful update of the wallpaper and the KLIK will restart. Note that KLIK will be shown to be offline as the unit restarts with the new wallpaper.

Change Password
KLIK Boks requires an administrator’s password to allow access to settings through the web interface. To change that password, select Change Password from the General Settings menu.

Enter the new password twice, then click Change to update KLIK Boks to the new Admin password.

Update Firmware
KLIK Manager automatically compares the installed firmware on connected KLIK Boks units with the update server to determine if a new firmware version is available for that unit. Firmware updates may be applied from the KLIK Manager in either Local or Global mode by selecting Update Firmware from the General Settings pane.
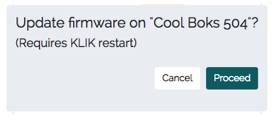
Select Proceed to continue with the automatic update. The latest firmware version will be downloaded and installed, followed by a KLIK Boks restart.
KLIK Restart
There may be occasions when a KLIK restart is required, even if no changes have been made to settings. Click on Restart KLIK to initiate the restart process.
Network Settings
Dynamic IP Address
When connected to a wired network, KLIK can be assigned an IP address automatically by the DHCP server. Automatic (dynamic) IP address assignment requires that the DHCP control be selected with a check mark.
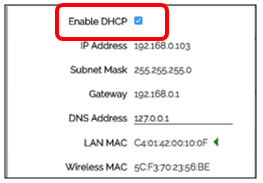
When DHCP is selected, the IP Address, Subnet Mask and Gateway entries are fixed by the server settings and may not be edited. The DNS Address remains editable however. A green icon will appear to the right of the active Mac Address, depending on how KLIK is connected to the network—wired, or wireless.
Static IP Address
To manually enter the network settings, clear the DHCP selection. All editable fields will be indicated by an underline.
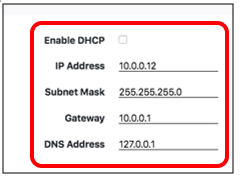
Note that fixed IP Address settings are not available when KLIK is connected to a wireless network. Consult with your Wi-Fi service provider to determine if they support assignment of fixed IP addresses to wireless clients through Mac addresses.
Remote Viewing
KLIK Manager allows the user to remotely view the content being streamed to a KLIK Boks, when that KLIK Boks is in a streaming session. This feature is helpful when diagnosing reported issues and can be employed as a confidence monitor, assuring that the KLIK Boks is online and functioning as expected. When no content is being streamed, Manager will display the wallpaper of the selected device.
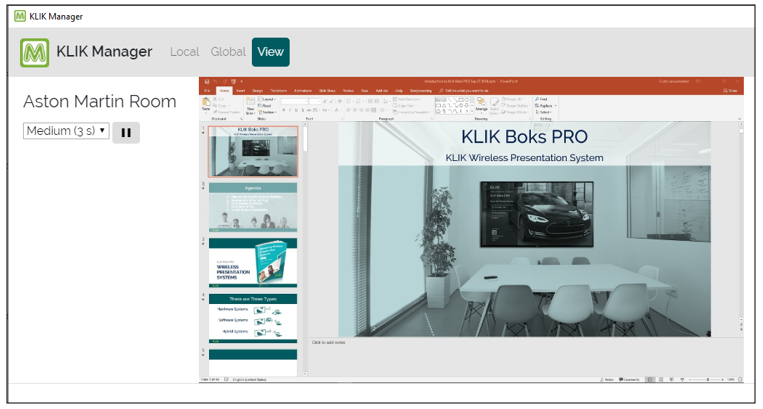
To enable the remote viewing feature, select an active KLIK Boks by clicking anywhere inside its row. The row will be highlighted, indicating it is selected. Click on the corresponding “View” button to initiate the viewing session.

Once initiated, the KLIK Boks output will be shown in the Action Area, in its original aspect ratio. The image will be accompanied by the KLIK Name, and two controls.
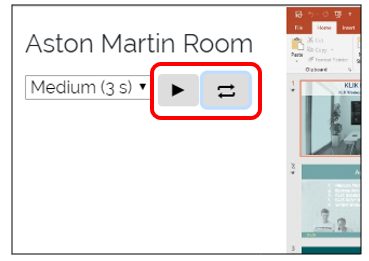
The pull-down control allows selection of a refresh rate that sets the time interval at which a new screen image is captured and displayed in the Manager. The stream may also be paused and restarted as needed, or the screen may be manually refreshed when automatic refresh is paused.
Viewing sessions may be terminated by navigating away from the View tab or by selecting another KLIK Boks unit from the discovery panel. Returning to the last viewed KLIK Boks, while the View tab is selected, will immediately restart the viewing session.
Download a PDF version of this article:


Comments
0 comments
Please sign in to leave a comment.